Small scripts for everyday file tasks
Python Utilities
Pick a script, edit its marked settings, and run it on your computer.
Built from TCO cleanup work. Many of these scripts were written to clean up Traffic Control Order (TCO) files. Their examples reflect those jobs; match the settings and filename format to your own files. Historical values are not a current TCO naming standard.
Edit the marked settings
Every download has a clearly marked settings box near the top. Folder utilities use FOLDER_PATH. For a single input file, the MediaWiki converter and UD-10 downloader use CSV_FILE_PATH, the wrapped-data cleaner uses INPUT_FILE_PATH, the PDF-to-MP3 converter uses PDF_FILE_PATH, audio transcription uses AUDIO_FILE_PATH, and seasonal factor heatmaps use EXCEL_FILE_PATH. Some scripts also need a marker, suffix, number range, or other job setting.
# FOLDER_PATH: paste the folder you want to process.
FOLDER_PATH = r"C:\CHANGE_ME\YourFolder"
For example, use FOLDER_PATH = r"C:\Work\Turning Prohibitions". Keep the r and quotation marks. Spaces are fine; do not put a backslash at the end of the path.
- Check Python. Open Windows Terminal and enter
py --version. If Python is missing, follow the official Python Windows setup instructions. The PDF-to-MP3 converter, audio transcription tool, and seasonal factor heatmaps need extra packages. The SVG-to-DXF converter needs desktop Inkscape. Their listings include setup instructions. - Find your folder path. In File Explorer, open the folder you want to process, click the address bar, and copy the full path. Paste it between the quotes in the script. Any mapped drive must be connected when the script runs.
- Review that utility's settings. Each listing identifies its file types and whether it includes subfolders. The third-section replacement and year conversion require you to supply the historical job settings before they will run.
- Edit and save the download. Use Notepad or another text editor. If using Save As, choose All files and keep the
.pyextension, rather than.py.txt.
When you run a script: file-changing utilities apply their operation immediately, except Find and Replace, which previews changes and asks for confirmation. Folder and filename checks only print findings. The converters, audio transcription tool, and UD-10 downloader create output files and leave their inputs unchanged. Subfolder behavior is shown on each listing. Existing files are preserved unless you explicitly enable DXF replacement in the SVG-to-DXF converter. Symbolic links are not processed. The website does not receive your files. The PDF-to-MP3 script sends extracted text to Google's speech service. The UD-10 downloader sends each crash ID to SEMCOG to retrieve its report. Both require internet access. Whisper downloads its model on first use, then transcribes audio locally. The other utilities work locally.
Text & missing numbers
Work with TXT placeholders and gaps in TCO number sequences.
.txt · Selected folder only
Fill Empty TXT Files
Write each zero-byte TXT file's own filename into its body, including the extension.
- Before / input
- Oak at Main.txt — empty (0 bytes)
- After / result
- File contains: Oak at Main.txt
Files containing text, spaces, or blank lines stay unchanged. Uppercase extensions are included.
Original: add Text.py
Settings & step-by-step instructions
Change FOLDER_PATH near the top of the downloaded script. The values below show how the download starts.
FOLDER_PATH = r"C:\CHANGE_ME\YourFolder"- Download
fill_empty_txt_files.pyand open it in Notepad or another text editor. - Edit the marked settings and save the file with its
.pyextension. See the setup instructions. - Open the folder containing the downloaded script in File Explorer, then right-click an empty area and choose Open in Terminal. Run:
py .\fill_empty_txt_files.py - Read the file-by-file results and summary in the terminal.
View Python code
Open this section to load the downloadable code.
.txt · Selected folder only
Append a TCO Investigation Note
Append a filename-specific investigation note to TXT files, retaining any existing text.
- Before / input
- TP-123.txt containing TP-123.txt
- After / result
- Existing text, followed by a TCO investigation note
The original note says the TCO is either missing or rescinded and needs investigation. This is a cleanup note, not a verified determination of TCO status. Identical notes already present are not appended again.
Original: add to text.py
Settings & step-by-step instructions
Change FOLDER_PATH and the job settings shown below near the top of the downloaded script. The values below show how the download starts.
FOLDER_PATH = r"C:\CHANGE_ME\YourFolder"
NOTE_TEMPLATE = "this TCO {filename} is either missing or has been rescinded. Need further investigation."
# Keep {filename} where the name should appear; other text is editable.
RECURSIVE = False- Download
append_tco_note.pyand open it in Notepad or another text editor. - Edit the marked settings and save the file with its
.pyextension. See the setup instructions. - Open the folder containing the downloaded script in File Explorer, then right-click an empty area and choose Open in Terminal. Run:
py .\append_tco_note.py - Read the file-by-file results and summary in the terminal.
View Python code
Open this section to load the downloadable code.
Reads numbered filenames; creates .txt · Selected folder only
Create Missing TCO Number Placeholders
Find gaps in a TP or YS number sequence and create TXT placeholders for the missing numbers.
- Before / input
- TP-10.pdf and TP-12.pdf
- After / result
- Creates empty TP-11.txt
PRESET = "TP" fills gaps from the lowest to highest existing number, creating empty TP-11.txt-style files. PRESET = "YS" starts at 50 and creates YS-051-.txt-style names with the original missing-or-never-taken note. You can set an explicit START_NUMBER and END_NUMBER. Empty folders require an explicit range. Placeholders do not establish the actual status of a TCO.
Originals: add Files in sequance.py, add Text files.py
Settings & step-by-step instructions
Change FOLDER_PATH and the job settings shown below near the top of the downloaded script. The values below show how the download starts.
FOLDER_PATH = r"C:\CHANGE_ME\YourFolder"
PRESET = "TP"  # "TP" for turning prohibitions, or "YS" for the YS job.
START_NUMBER = None  # None: lowest existing TP number, or 50 for YS.
END_NUMBER = None  # None: highest existing number.
RECURSIVE = False # Keep False: one number sequence per selected folder.- Download
create_missing_sequence_files.pyand open it in Notepad or another text editor. - Edit the marked settings and save the file with its
.pyextension. See the setup instructions. - Open the folder containing the downloaded script in File Explorer, then right-click an empty area and choose Open in Terminal. Run:
py .\create_missing_sequence_files.py - Read the file-by-file results and summary in the terminal.
View Python code
Open this section to load the downloadable code.
TCO filename sections
Apply a specific naming operation to records with the matching filename structure.
All file types · Includes subfolders
Add a Hyphen After YS or SS
Change YS followed by a space to YS-, and SS followed by a space to SS-, in filenames.
- Before / input
- YS 050-1200-2024.pdf
- After / result
- YS-050-1200-2024.pdf
Matches uppercase YS and SS exactly. Existing destination names are skipped rather than assigned an extra number.
Original: add dash after SS.py
Settings & step-by-step instructions
Change FOLDER_PATH and the job settings shown below near the top of the downloaded script. The values below show how the download starts.
FOLDER_PATH = r"C:\CHANGE_ME\YourFolder"
RECURSIVE = True  # True includes subfolders; False processes only this folder.
EXTENSIONS = () # Empty means all file types.- Download
normalize_stop_yield_separator.pyand open it in Notepad or another text editor. - Edit the marked settings and save the file with its
.pyextension. See the setup instructions. - Open the folder containing the downloaded script in File Explorer, then right-click an empty area and choose Open in Terminal. Run:
py .\normalize_stop_yield_separator.py - Read the file-by-file results and summary in the terminal.
View Python code
Open this section to load the downloadable code.
.pdf, .docx · Includes subfolders
Pad the Second TCO Section
Add leading zeros to a numeric second section in a hyphen-separated TCO filename.
- Before / input
- YS-7-1200-2024.pdf
- After / result
- YS-007-1200-2024.pdf
The original width is three digits. Longer numbers and nonnumeric sections stay unchanged.
Original: second part three.py
Settings & step-by-step instructions
Change FOLDER_PATH and the job settings shown below near the top of the downloaded script. The values below show how the download starts.
FOLDER_PATH = r"C:\CHANGE_ME\YourFolder"
WIDTH = 3  # Minimum number of digits in the second section.
RECURSIVE = True
EXTENSIONS = (".pdf", ".docx")- Download
pad_tco_sequence_number.pyand open it in Notepad or another text editor. - Edit the marked settings and save the file with its
.pyextension. See the setup instructions. - Open the folder containing the downloaded script in File Explorer, then right-click an empty area and choose Open in Terminal. Run:
py .\pad_tco_sequence_number.py - Read the file-by-file results and summary in the terminal.
View Python code
Open this section to load the downloadable code.
All file types · Includes subfolders
Add Revision and Folder Name
Append the containing folder's name to TCO filenames with four or five hyphen-separated sections. Four-section names first receive a default revision.
- Before / input
- YS-050-1200-2024.pdf in Oak Estates
- After / result
- YS-050-1200-2024-R0-Oak Estates.pdf
Uses each file's immediate parent folder, including the selected root folder. Already appended names and names with other section counts are skipped.
Original: append folder to file name..py
Settings & step-by-step instructions
Change FOLDER_PATH and the job settings shown below near the top of the downloaded script. The values below show how the download starts.
FOLDER_PATH = r"C:\CHANGE_ME\YourFolder"
DEFAULT_REVISION = "R0"  # Used only when the original name has four sections.
RECURSIVE = True
EXTENSIONS = ()- Download
append_folder_to_tco_filename.pyand open it in Notepad or another text editor. - Edit the marked settings and save the file with its
.pyextension. See the setup instructions. - Open the folder containing the downloaded script in File Explorer, then right-click an empty area and choose Open in Terminal. Run:
py .\append_folder_to_tco_filename.py - Read the file-by-file results and summary in the terminal.
View Python code
Open this section to load the downloadable code.
.pdf, .docx · Selected folder only
Clean TCO Prefix, Spaces and Third Section
Apply the original combined cleanup: remove a leading TCO label, replace spaces with hyphens, and append 00 to a two-digit third section. Each step can be switched off.
- Before / input
- TCO TS 007 12 2024.pdf
- After / result
- TS-007-1200-2024.pdf
The third-section operation appends zeros (12 becomes 1200), rather than adding leading zeros. For the add-00-only original, disable the first two steps and set EXTENSIONS to PDF only. Nonnumeric sections are skipped for the numeric step.
Originals: add 00 to thrid section.py, take away tco add 0000 and add -.py
Settings & step-by-step instructions
Change FOLDER_PATH and the job settings shown below near the top of the downloaded script. The values below show how the download starts.
FOLDER_PATH = r"C:\CHANGE_ME\YourFolder"
REMOVE_TCO_PREFIX = True  # Remove "TCO " only at the start.
REPLACE_SPACES = True
EXPAND_THIRD_SECTION = True  # Append THIRD_SECTION_SUFFIX to two-digit numbers.
THIRD_SECTION_SUFFIX = "00"
RECURSIVE = False
EXTENSIONS = (".pdf", ".docx")- Download
normalize_tco_filename.pyand open it in Notepad or another text editor. - Edit the marked settings and save the file with its
.pyextension. See the setup instructions. - Open the folder containing the downloaded script in File Explorer, then right-click an empty area and choose Open in Terminal. Run:
py .\normalize_tco_filename.py - Read the file-by-file results and summary in the terminal.
View Python code
Open this section to load the downloadable code.
.pdf, .docx · Includes subfolders
Replace the Third TCO Section
Replace a matching third section in a hyphen-separated TCO filename with a chosen value.
- Before / input
- YS-050-1200-2024.pdf
- After / result
- YS-050-2500-2024.pdf
Historical example only: the old job used 2500 when the third section contained "0" or "25" anywhere. Its purpose is unconfirmed. Set REPLACEMENT and MATCH_TEXT explicitly before running; the download starts with these settings blank. Matches are substrings, not exact numbers.
Original: rename thrid part.py
Settings & step-by-step instructions
Change FOLDER_PATH, REPLACEMENT and MATCH_TEXT near the top of the downloaded script. The values below show how the download starts.
FOLDER_PATH = r"C:\CHANGE_ME\YourFolder"
REPLACEMENT = ""  # REQUIRED: choose the replacement. Old job example: "2500".
MATCH_TEXT = ()  # REQUIRED: choose matching substrings. Old example: ("0", "25").
RECURSIVE = True
EXTENSIONS = (".pdf", ".docx")- Download
replace_tco_third_section.pyand open it in Notepad or another text editor. - Edit the marked settings and save the file with its
.pyextension. See the setup instructions. - Open the folder containing the downloaded script in File Explorer, then right-click an empty area and choose Open in Terminal. Run:
py .\replace_tco_third_section.py - Read the file-by-file results and summary in the terminal.
View Python code
Open this section to load the downloadable code.
.pdf, .docx, .jpg · Includes subfolders
Expand a Two-Digit TCO Year
Expand the fourth hyphen-separated section from a two-digit year to a four-digit year.
- Before / input
- YS-050-1200-24.pdf
- After / result
- YS-050-1200-2024.pdf
Historical example only: cutoff 25 turns 00–24 into 2000–2024 and 25–99 into 1925–1999. Its purpose is unconfirmed. YEAR_CUTOFF starts unset and must be chosen for your records. For example, cutoff 27 maps 26 to 2026, while cutoff 25 maps 26 to 1926. No cutoff is selected automatically.
Original: years.py
Settings & step-by-step instructions
Change FOLDER_PATH and YEAR_CUTOFF near the top of the downloaded script. The values below show how the download starts.
FOLDER_PATH = r"C:\CHANGE_ME\YourFolder"
YEAR_CUTOFF = None  # REQUIRED: choose a number from 0 to 100. Old job used 25.
# Years below the cutoff become 20xx; the rest become 19xx.
# Example: cutoff 25 turns 24 into 2024, but 25 into 1925.
RECURSIVE = True
EXTENSIONS = (".pdf", ".docx", ".jpg")- Download
expand_tco_year.pyand open it in Notepad or another text editor. - Edit the marked settings and save the file with its
.pyextension. See the setup instructions. - Open the folder containing the downloaded script in File Explorer, then right-click an empty area and choose Open in Terminal. Run:
py .\expand_tco_year.py - Read the file-by-file results and summary in the terminal.
View Python code
Open this section to load the downloadable code.
All file types · Selected folder only
Keep Text Before a Comma and Add a Revision
Keep the filename text before the first comma, discard the text after it, and add a revision suffix before the extension.
- Before / input
- TS-007-1200-2024, scanned copy.pdf
- After / result
- TS-007-1200-2024-R0.pdf
Despite its old filename, this script keeps the LEFT side of the comma. It does not repeat a revision suffix already at the end.
Original: to the right of comma.py
Settings & step-by-step instructions
Change FOLDER_PATH and the job settings shown below near the top of the downloaded script. The values below show how the download starts.
FOLDER_PATH = r"C:\CHANGE_ME\YourFolder"
REVISION_SUFFIX = "-R0"  # Text to append before the extension.
RECURSIVE = False
EXTENSIONS = ()- Download
trim_after_comma_add_revision.pyand open it in Notepad or another text editor. - Edit the marked settings and save the file with its
.pyextension. See the setup instructions. - Open the folder containing the downloaded script in File Explorer, then right-click an empty area and choose Open in Terminal. Run:
py .\trim_after_comma_add_revision.py - Read the file-by-file results and summary in the terminal.
View Python code
Open this section to load the downloadable code.
Filename cleanup
Trim, replace, or move text in filenames.
.pdf, .docx · Selected folder only
Replace Spaces in PDF and Word Filenames
Replace spaces with hyphens in PDF and Word filenames while preserving document contents.
- Before / input
- Turning Prohibition.pdf; Meeting Notes.docx
- After / result
- Turning-Prohibition.pdf; Meeting-Notes.docx
Names without spaces and existing destination names are skipped.
Original: add dash.py
Settings & step-by-step instructions
Change FOLDER_PATH near the top of the downloaded script. The values below show how the download starts.
FOLDER_PATH = r"C:\CHANGE_ME\YourFolder"- Download
replace_spaces_in_filenames.pyand open it in Notepad or another text editor. - Edit the marked settings and save the file with its
.pyextension. See the setup instructions. - Open the folder containing the downloaded script in File Explorer, then right-click an empty area and choose Open in Terminal. Run:
py .\replace_spaces_in_filenames.py - Read the file-by-file results and summary in the terminal.
View Python code
Open this section to load the downloadable code.
All file types · Selected folder only
Move a Filename Section to the End
Move a whole hyphen-separated section, originally NLT, to the end of a filename before its extension.
- Before / input
- TP-NLT-123.pdf
- After / result
- TP-123-NLT.pdf
Matches a whole section, not NLT embedded inside another word. Already-final sections stay in place.
Original: move text in file name.py
Settings & step-by-step instructions
Change FOLDER_PATH and the job settings shown below near the top of the downloaded script. The values below show how the download starts.
FOLDER_PATH = r"C:\CHANGE_ME\YourFolder"
TOKEN = "NLT"  # Whole section to move; match is case-sensitive.
RECURSIVE = False
EXTENSIONS = ()- Download
move_filename_token_to_end.pyand open it in Notepad or another text editor. - Edit the marked settings and save the file with its
.pyextension. See the setup instructions. - Open the folder containing the downloaded script in File Explorer, then right-click an empty area and choose Open in Terminal. Run:
py .\move_filename_token_to_end.py - Read the file-by-file results and summary in the terminal.
View Python code
Open this section to load the downloadable code.
All file types · Selected folder only
Append a Filename Suffix
Add a chosen suffix before the extension. The original TCO job used -NTORH for its Hours folder.
- Before / input
- TP-123.pdf
- After / result
- TP-123-NTORH.pdf
Set SUFFIX for the current job. Names already ending in that exact suffix are skipped.
Original: suffix.py
Settings & step-by-step instructions
Change FOLDER_PATH and the job settings shown below near the top of the downloaded script. The values below show how the download starts.
FOLDER_PATH = r"C:\CHANGE_ME\YourFolder"
SUFFIX = "-NTORH"  # Text to add before the file extension.
RECURSIVE = False
EXTENSIONS = ()- Download
append_filename_suffix.pyand open it in Notepad or another text editor. - Edit the marked settings and save the file with its
.pyextension. See the setup instructions. - Open the folder containing the downloaded script in File Explorer, then right-click an empty area and choose Open in Terminal. Run:
py .\append_filename_suffix.py - Read the file-by-file results and summary in the terminal.
View Python code
Open this section to load the downloadable code.
.txt · Selected folder only
Remove a Trailing Filename Suffix
Remove a chosen suffix from the end of a filename's stem. The original job removed -NLT from TXT placeholder names.
- Before / input
- TP-123-NLT.txt
- After / result
- TP-123.txt
Only the trailing suffix is removed; the same text elsewhere in the name stays unchanged. The match is case-sensitive.
Original: strip ending.py
Settings & step-by-step instructions
Change FOLDER_PATH and the job settings shown below near the top of the downloaded script. The values below show how the download starts.
FOLDER_PATH = r"C:\CHANGE_ME\YourFolder"
SUFFIX = "-NLT"  # Exact trailing text to remove before the extension.
RECURSIVE = False
EXTENSIONS = (".txt",)- Download
remove_filename_suffix.pyand open it in Notepad or another text editor. - Edit the marked settings and save the file with its
.pyextension. See the setup instructions. - Open the folder containing the downloaded script in File Explorer, then right-click an empty area and choose Open in Terminal. Run:
py .\remove_filename_suffix.py - Read the file-by-file results and summary in the terminal.
View Python code
Open this section to load the downloadable code.
All file types · Selected folder only
Trim Before a Filename Marker
Remove text before the first chosen marker, keeping the marker and the rest of the filename.
- Before / input
- Scanned copy TS 123.pdf
- After / result
- TS 123.pdf
Choose MARKER = "TS ", "63", or " P " to match the three original jobs. The space-P-space preset produces P 123.pdf after trimming outer spaces. Matches are case-sensitive.
Originals: strip before 63.py, strip before space p space.py, strip before TS.py
Settings & step-by-step instructions
Change FOLDER_PATH and the job settings shown below near the top of the downloaded script. The values below show how the download starts.
FOLDER_PATH = r"C:\CHANGE_ME\YourFolder"
MARKER = "TS "  # Original presets: "TS ", "63", or " P ".
RECURSIVE = False
EXTENSIONS = ()- Download
trim_before_filename_marker.pyand open it in Notepad or another text editor. - Edit the marked settings and save the file with its
.pyextension. See the setup instructions. - Open the folder containing the downloaded script in File Explorer, then right-click an empty area and choose Open in Terminal. Run:
py .\trim_before_filename_marker.py - Read the file-by-file results and summary in the terminal.
View Python code
Open this section to load the downloadable code.
All file types · Includes subfolders by default
Find and Replace Filename Text
Replace literal text in filenames. Also covers the original job that removed TCO text and trimmed the remaining outer spaces.
- Before / input
- TCO TS 123.pdf
- After / result
- TS 123.pdf
For the TCO-removal job use FIND_TEXT = "TCO", REPLACE_WITH = "", TRIM_OUTER_SPACES = True, and RECURSIVE = False. The general find-and-replace original searched subfolders and asked for confirmation; this version previews changes before asking you to type yes. Replacement text cannot contain folder separators. This utility can also replace extension text when the find text matches it.
Originals: fiund and replaec.py, take away leading text.py
Settings & step-by-step instructions
Change FOLDER_PATH and the job settings shown below near the top of the downloaded script. The values below show how the download starts.
FOLDER_PATH = r"C:\CHANGE_ME\YourFolder"
FIND_TEXT = "TCO"  # Exact, case-sensitive text to find anywhere in the filename.
REPLACE_WITH = ""  # Empty text removes the match.
TRIM_OUTER_SPACES = True
RECURSIVE = True
EXTENSIONS = ()- Download
find_replace_filenames.pyand open it in Notepad or another text editor. - Edit the marked settings and save the file with its
.pyextension. See the setup instructions. - Open the folder containing the downloaded script in File Explorer, then right-click an empty area and choose Open in Terminal. Run:
Review the printed changes and typepy .\find_replace_filenames.pyyesonly when they match your intended replacements. - Read the file-by-file results and summary in the terminal.
View Python code
Open this section to load the downloadable code.
Folder & filename checks
Find items needing attention without changing files.
All file types · Selected folder only · Report only
List Filenames Missing a Marker
Print filenames that do not contain a chosen marker. The original parking-restriction check looked for space-P-space.
- Look for
- Scan 123.pdf; Oak P 123.pdf
- Report
- Reports Scan 123.pdf only
MARKER = " P " includes a space on each side and matches case-sensitively. This report does not rename or edit files.
Original: check for P.py
Settings & step-by-step instructions
Change FOLDER_PATH and the job settings shown below near the top of the downloaded script. The values below show how the download starts.
FOLDER_PATH = r"C:\CHANGE_ME\YourFolder"
MARKER = " P "  # Exact text expected in a filename.
RECURSIVE = False- Download
report_missing_filename_marker.pyand open it in Notepad or another text editor. - Edit the marked settings and save the file with its
.pyextension. See the setup instructions. - Open the folder containing the downloaded script in File Explorer, then right-click an empty area and choose Open in Terminal. Run:
py .\report_missing_filename_marker.py - Read the reported paths and summary in the terminal. This tool does not change or delete files.
View Python code
Open this section to load the downloadable code.
Folders · Includes subfolders · Report only
Find Empty Folders
List folders containing no files or subfolders, including the starting folder if it is empty.
- Look for
- Oak Estates folder with no contents
- Report
- Reports the empty folder's full path
This report does not delete folders. A folder containing only an empty subfolder is not itself empty. Symbolic links and directory junctions are not followed.
Original: empty folders.py
Settings & step-by-step instructions
Change FOLDER_PATH and the job settings shown below near the top of the downloaded script. The values below show how the download starts.
FOLDER_PATH = r"C:\CHANGE_ME\YourFolder"
RECURSIVE = True # True checks subfolders too; False checks only FOLDER_PATH.- Download
find_empty_folders.pyand open it in Notepad or another text editor. - Edit the marked settings and save the file with its
.pyextension. See the setup instructions. - Open the folder containing the downloaded script in File Explorer, then right-click an empty area and choose Open in Terminal. Run:
py .\find_empty_folders.py - Read the reported paths and summary in the terminal. This tool does not change or delete files.
View Python code
Open this section to load the downloadable code.
Data cleanup & wiki tables
Join wrapped records or prepare a wiki table from a CSV export.
.csv input · .txt output · One file at a time
Convert a Pay-Item CSV to MediaWiki
Turn a pay-item CSV export into a MediaWiki table ready to paste into a wiki page's source editor. The table columns are PayItemCode, Units, Description, and AUP, in that order.
- CSV input
PayItemCode,Units,Description,AUP 0012345,Ea,"Example, item",12.50- MediaWiki output
{| class="wikitable"
! PayItemCode !! Units !! Description !! AUP
|-
| 0012345 || Ea || Example, item || 12.50
|}
The CSV must include those four headers; their order can vary, and extra columns are ignored. Quoted commas, blank cells, UTF-8 text, and line breaks in cells are supported. Item codes keep leading zeros and values keep their original decimal formatting. Literal wiki characters are escaped. The default output is MediaWiki_Table.txt beside the CSV; choose another output path if that file already exists.
Original: CVS to WIki/CVS to Wiki Table.py. This version needs no pandas installation.
Settings & step-by-step instructions
Set CSV_FILE_PATH to the full input filename. Leave OUTPUT_FILE_PATH blank to save beside it, or enter a new output filename.
CSV_FILE_PATH = r"C:\CHANGE_ME\pay_items.csv"
OUTPUT_FILE_PATH = ""
CSV_ENCODING = "utf-8-sig"- Prepare a comma-separated CSV with the four required headers. If exporting from a spreadsheet, choose CSV UTF-8.
- Download
csv_to_mediawiki.py, open it in a text editor, edit the marked file paths, and save. For example:CSV_FILE_PATH = r"C:\Work\pay_items.csv". An optional output could beOUTPUT_FILE_PATH = r"C:\Work\Pay_Items_Wiki.txt". - Open the folder containing the downloaded script in File Explorer, then right-click an empty area and choose Open in Terminal. Run:
py .\csv_to_mediawiki.py - Open the output text file shown in the terminal. Copy its contents into the wiki page's source editor and preview the table. See MediaWiki's table instructions.
If a header is missing or a CSV row is malformed, the script explains the problem without creating output. For an encoding error, export the CSV as UTF-8. Running the script does not publish or edit a wiki page.
View Python code
Open this section to load the downloadable code.
.csv or .txt input · .csv output · One file at a time
Join Wrapped Data Lines
Join records that have been split across several text lines. Each line containing a comma starts a new record; following lines without commas are appended to that record using , .
- Before
1001, Main Street Northbound 1002, Oak Road Southbound- After
1001, Main Street, Northbound
1002, Oak Road, Southbound
Use this for data where every record starts on a line containing a comma and continuation lines contain no commas. Any comma, including one inside quotes, starts a new record. Outer whitespace is trimmed, blank lines are ignored, and existing text and numeric formatting are preserved. This operation does not validate CSV columns or quoted multiline fields.
The default output is <input name>_cleaned.csv beside the input. The source is unchanged, and existing output files are never replaced. If nonblank text appears before the first comma-containing record, the script reports the line number without creating output.
Original: clean_data.py. Uses editable path settings instead of desktop file dialogs.
Settings & step-by-step instructions
Set INPUT_FILE_PATH to the full input filename. Leave OUTPUT_FILE_PATH blank to save beside it, or enter a new output filename.
INPUT_FILE_PATH = r"C:\CHANGE_ME\wrapped_data.csv"
OUTPUT_FILE_PATH = ""
INPUT_ENCODING = "utf-8-sig"- Check that your CSV or text file follows the before-and-after example. A continuation line containing a comma will be treated as a separate record.
- Download
clean_wrapped_data.py, open it in a text editor, edit the marked file path, and save. For example:INPUT_FILE_PATH = r"C:\Work\wrapped_data.txt". - Open the folder containing the downloaded script in File Explorer, then right-click an empty area and choose Open in Terminal. Run:
py .\clean_wrapped_data.py - Open the output path printed in the terminal and review the joined records. If the output already exists, set
OUTPUT_FILE_PATHto a different filename.
UTF-8 files with or without a byte order mark are supported. If you see an encoding error, save the input as UTF-8. An empty input produces a clear message and no output file.
View Python code
Open this section to load the downloadable code.
PDF & audio
Turn PDF text into spoken audio, or transcribe a recording to text.
.pdf input · .mp3 output · One file at a time
Convert PDF to MP3
Extract text from a PDF and turn it into spoken audio with Google Text-to-Speech (gTTS). English is the default; choose the document's language and optionally use slower speech.
- Example PDF input
- Open Atomic Habits.pdf Supplied PDF · 22.0 MB Download example PDF
- Example MP3 output
- Download Atomic Habits.mp3 Supplied audio example · 18.7 MB
Requires internet access: the script sends extracted PDF text to Google's speech service. It reads selectable text in page order; it does not read images or perform OCR. Pages without readable text are skipped and reported. Reading order, headings, and page numbers depend on the PDF's text layout.
The default output is <PDF name>.mp3 beside the PDF. Existing files are never replaced, and an interrupted or failed conversion removes its incomplete MP3. Large documents can take a while. The files above are the supplied examples; you can play the audio without running Python.
Original: PDFtoGTTS.py. This version uses editable path settings instead of desktop file dialogs, and pypdf for text extraction.
Settings & step-by-step instructions
Set PDF_FILE_PATH to the full input filename. Leave OUTPUT_FILE_PATH blank to create an MP3 beside it, or enter a new output filename.
PDF_FILE_PATH = r"C:\CHANGE_ME\YourDocument.pdf"
OUTPUT_FILE_PATH = ""
LANGUAGE = "en"
SLOW = False- Download
pdf_to_mp3.py. In Windows Terminal, install its two packages once:py -m pip install pypdf gTTS - Download the example PDF or choose a PDF with selectable text. Open the script in a text editor and set the input path, for example
PDF_FILE_PATH = r"C:\Work\Atomic Habits.pdf". - If you also downloaded the example MP3 into that folder, choose a different output, such as
OUTPUT_FILE_PATH = r"C:\Work\Atomic Habits - new.mp3". Save the script. - Open the folder containing the script in File Explorer, then right-click an empty area and choose Open in Terminal. Run:
py .\pdf_to_mp3.py - Wait for the terminal to show MP3 saved to, then open that file in your audio player. Keep the terminal open until conversion finishes; press Ctrl+C to cancel.
For scanned PDFs, run OCR first. Encrypted PDFs need an unlocked copy. If the speech service is unavailable, check your connection and retry later. LANGUAGE selects pronunciation, not translation; see gTTS language support.
View Python code
Open this section to load the downloadable code.
Audio input · .txt output · One file at a time
Transcribe Audio to Text
Turn a WAV, MP3, or other recording that FFmpeg can read into a text transcript with Whisper. The script prints the transcript in the terminal and saves it as a UTF-8 text file.
- Example input
C:\Work\Meeting.wavA recording containing spoken audio- Default output
C:\Work\Meeting_transcription.txtThe recognized speech, in the recording's language
Runs on your computer: Whisper requires the openai-whisper package and FFmpeg. First use of a model requires internet access to download it; recordings are processed locally. The script uses your CPU with the original base model. Long recordings may take a while.
The audio stays unchanged. By default, the transcript is saved beside it as <audio name>_transcription.txt. Existing files are never replaced. This creates a plain transcript without timestamps or speaker labels; review the wording, names, and numbers against the recording.
Original: Transcribe.py. Replaces the fixed meeting path and transcription.txt output with editable settings.
Settings & step-by-step instructions
Set AUDIO_FILE_PATH to the full recording filename. Leave OUTPUT_FILE_PATH blank to save beside it, or enter a new .txt filename. Leave LANGUAGE blank for automatic detection, or use "en" for English.
AUDIO_FILE_PATH = r"C:\CHANGE_ME\Meeting.wav"
OUTPUT_FILE_PATH = ""
MODEL_NAME = "base"
LANGUAGE = ""- Install Whisper in Windows Terminal:
Use thepy -m pip install openai-whisperopenai-whisperpackage; the package namedwhisperis unrelated. If installation fails for your Python version, check the official Whisper setup instructions for supported versions. - Install FFmpeg, add the folder containing
ffmpeg.exeto your Windows Path environment variable, and reopen the terminal. Confirm it is available:ffmpeg -version - Download
transcribe_audio.py, open it in a text editor, and edit the marked settings. For example:AUDIO_FILE_PATH = r"C:\Work\Meeting.wav". Save the script. - Open the folder containing the script in File Explorer, then right-click an empty area and choose Open in Terminal. Run:
py .\transcribe_audio.py - Wait for Transcript saved to, then open the output text file. Keep the terminal open while it runs; press Ctrl+C to cancel. If the transcript already exists, choose another
OUTPUT_FILE_PATH.
Keep MODEL_NAME = "base" to match the original script. "tiny" is faster; "small" uses more resources. LANGUAGE identifies the spoken language and does not translate it.
View Python code
Open this section to load the downloadable code.
Crash reports
Download a set of SEMCOG UD-10 PDFs from a crash-ID list.
.csv input · .pdf downloads · One list at a time
Download UD-10 Reports from a CSV
Read crash IDs from the first column of a CSV and download each available UD-10 crash report from SEMCOG. Uses Python's standard library and an internet connection.
- Example input
-
Download Crash_IDs_for_2019.csv
547 unique crash IDs · 4.9 KB
Crash_ID 1652746 1914109 1664156 - Default output
UD10_reports\UD10_1652746.pdfOne PDF per available crash ID, in a new folder beside the CSV
The CSV needs a header row, such as Crash_ID, with digit-only IDs in its first column. Extra columns are ignored. Blank IDs are skipped, duplicates are requested once, and leading zeros are preserved. Invalid IDs are reported before any downloads begin.
Existing report files are skipped. Each download is checked for a PDF header and end marker; incomplete files are removed. The terminal reports downloads, skipped files, and errors. The script pauses between requests and stops if SEMCOG denies access or limits requests. Report availability depends on SEMCOG.
Original: ud10.py. Uses the report endpoint from the single-report UD-10 tool, replacing the old page's submit button and Chrome automation. No pandas, Selenium, or browser setup is needed.
Settings & step-by-step instructions
Set CSV_FILE_PATH to your crash-ID list. Leave OUTPUT_FOLDER blank to create UD10_reports beside the CSV, or enter another folder path.
CSV_FILE_PATH = r"C:\CHANGE_ME\Crash_IDs_for_2019.csv"
OUTPUT_FOLDER = ""
MAX_REPORTS = 0
DELAY_SECONDS = 1.0
TIMEOUT_SECONDS = 30- Download
download_ud10_reports.pyand the example CSV above, or prepare your own CSV with a header and crash IDs in the first column. - Open the script in a text editor and set the full CSV path, for example
CSV_FILE_PATH = r"C:\Work\Crash_IDs_for_2019.csv". To try just the first ID, setMAX_REPORTS = 1;0processes all unique IDs. Save the script. - Open the folder containing the script in File Explorer, then right-click an empty area and choose Open in Terminal. Run:
py .\download_ud10_reports.py - Review the terminal's summary and open the output folder to view the PDFs. If a download times out, increase
TIMEOUT_SECONDSand rerun. Previously saved reports are skipped.
Keep the terminal open while downloads run. Press Ctrl+C to cancel; completed PDFs are kept. If SEMCOG is unavailable, retry later. You can check one ID with the single-report tool.
View Python code
Open this section to load the downloadable code.
CAD & vector files
Prepare vector drawings for CAD software.
.svg input · .dxf output · Includes subfolders
Batch Convert SVG to DXF
Convert a folder of SVG vector graphics into DXF drawings using Inkscape. The script searches subfolders, runs conversions in parallel, and records the result for each file in a CSV report.
- Example SVG input
C:\Work\SVGs\Signs\Stop.svgSet FOLDER_PATH to C:\Work\SVGs- Default DXF output
C:\Work\SVGs\Signs\Stop.dxfOr set OUTPUT_FOLDER to C:\Work\CAD to create C:\Work\CAD\Signs\Stop.dxf
Requires Inkscape installed on your computer. No extra Python packages are needed. SVG originals are unchanged. Existing DXFs are skipped by default; set OVERWRITE = True or pass --overwrite to replace them after a successful conversion. Failed exports leave existing DXFs intact.
The default report is conversion_report.csv in the output folder, or the selected SVG folder when no separate output is set. Later runs create numbered reports such as conversion_report_2.csv. An explicit report filename must be new. Reports list input, output, status, elapsed seconds, and any Inkscape message.
Scale, layers, curves, and text depend on Inkscape's DXF export. Open a converted drawing in your CAD software and check its units and geometry before using it. Symbolic links and directory junctions are skipped.
Original: batch_svg_to_dxf.py. The command-line options are retained alongside the editable settings.
Settings & step-by-step instructions
Set FOLDER_PATH to the folder containing your SVGs. Leave OUTPUT_FOLDER blank to save beside each SVG, or choose another folder to mirror the subfolder structure.
FOLDER_PATH = r"C:\CHANGE_ME\YourFolder"
INKSCAPE_PATH = ""
OUTPUT_FOLDER = ""
REPORT_FILE_PATH = ""
WORKERS = 2
OVERWRITE = False
TIMEOUT_SECONDS = 120- Install Inkscape. The script checks PATH and common Windows installation locations. If it cannot find Inkscape, set
INKSCAPE_PATHto its executable, for exampler"C:\Program Files\Inkscape\bin\inkscape.exe". - Download
batch_svg_to_dxf.py, open it in a text editor, edit the marked settings, and save. For example:FOLDER_PATH = r"C:\Work\SVGs". - Open the folder containing the script in File Explorer, then right-click an empty area and choose Open in Terminal. Run:
py .\batch_svg_to_dxf.py - Review the terminal's summary and the CSV report path. A failed file does not stop the other conversions. If Inkscape needs longer for a complex drawing, increase
TIMEOUT_SECONDS; reduceWORKERSif your computer is busy.
You can also pass the folder and options on the command line. These override the corresponding settings:
py .\batch_svg_to_dxf.py "C:\Work\SVGs" --mirror-out "C:\Work\CAD" --workers 2
py .\batch_svg_to_dxf.py --help
Other options are --inkscape, --report, --overwrite, and --timeout. Quote paths containing spaces. Conversion happens on your computer; this page does not upload or convert drawings.
View Python code
Open this section to load the downloadable code.
Traffic data
Visualize seasonal patterns in your traffic factor tables.
.xlsx input · Yearly .png heatmaps · Runs locally
Seasonal Factor Heatmaps
Read a seasonal factor table from Excel and create one heatmap per year. Each chart arranges January through December down the rows and Monday through Sunday across the columns. All selected years share a color scale centered at 1.00 so you can compare them.
- Example workbook
- Download Seasonal Factor Table.xlsx 300 monthly records · 1999–2023 · Default charts: 2021–2023
- Supplied chart examples
- 2021 PNG · 2022 PNG · 2023 PNG PDFs: 21–23 Seasonal Factors.pdf · Seasonal.pdf
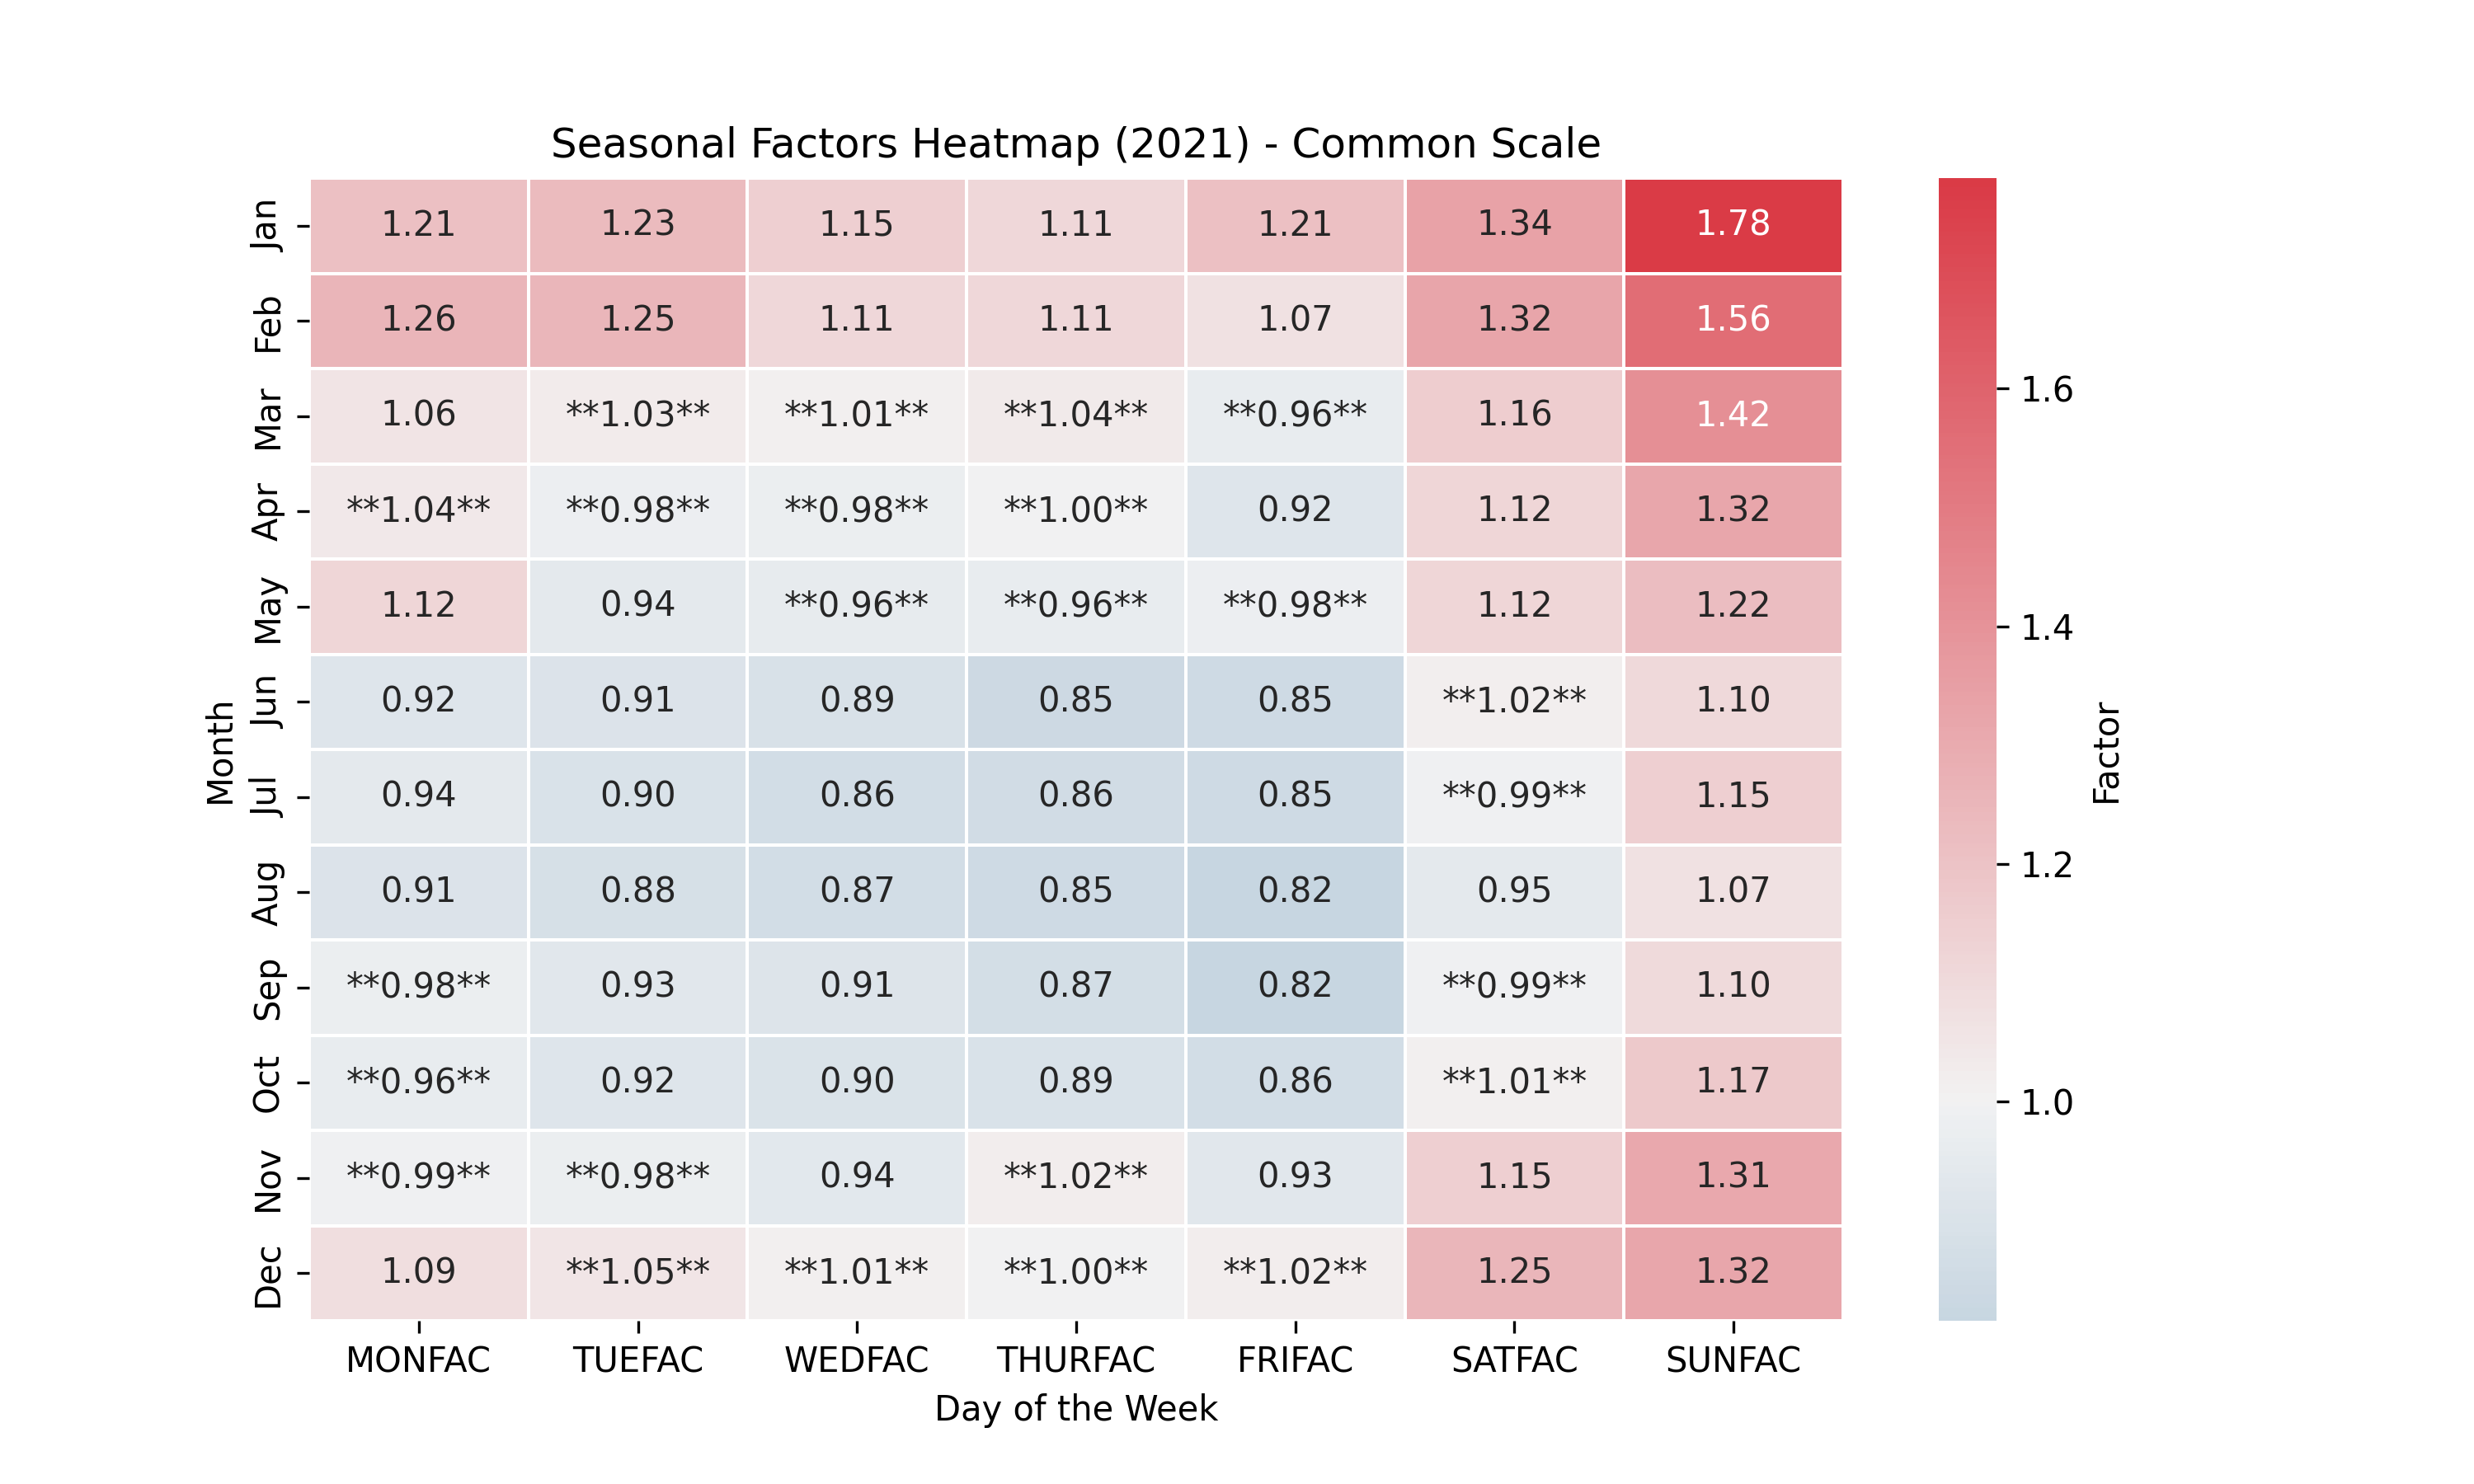
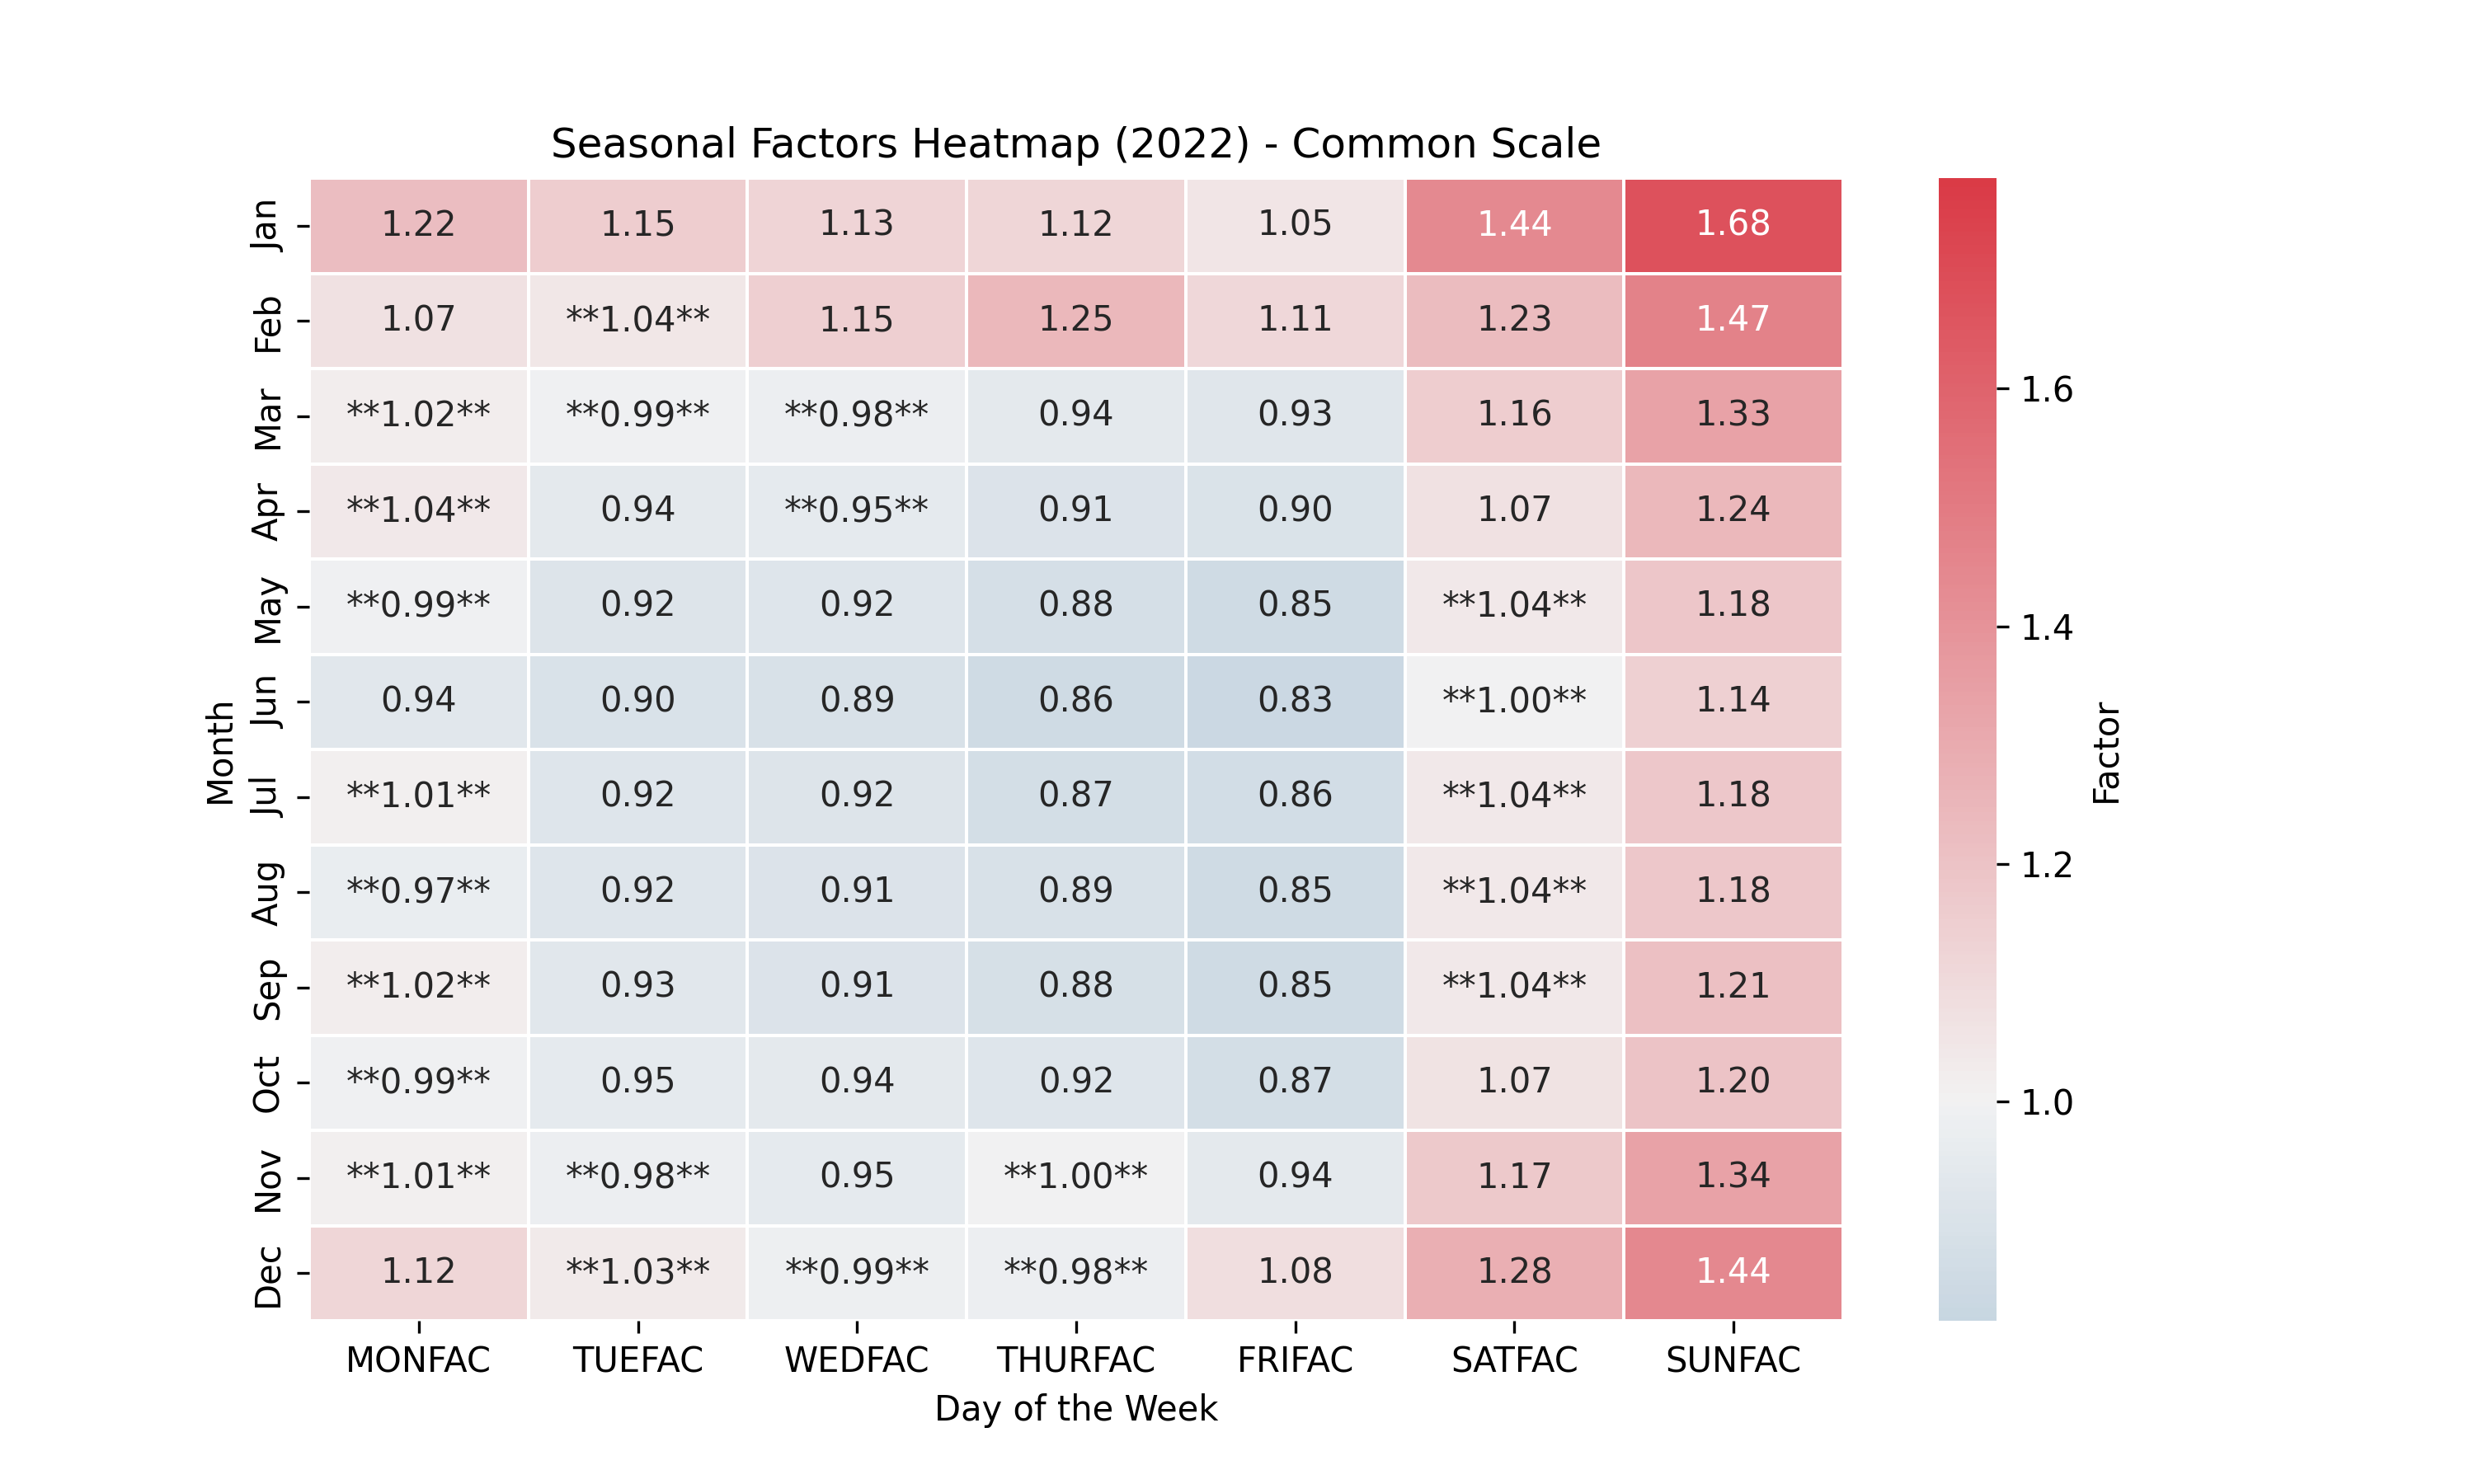
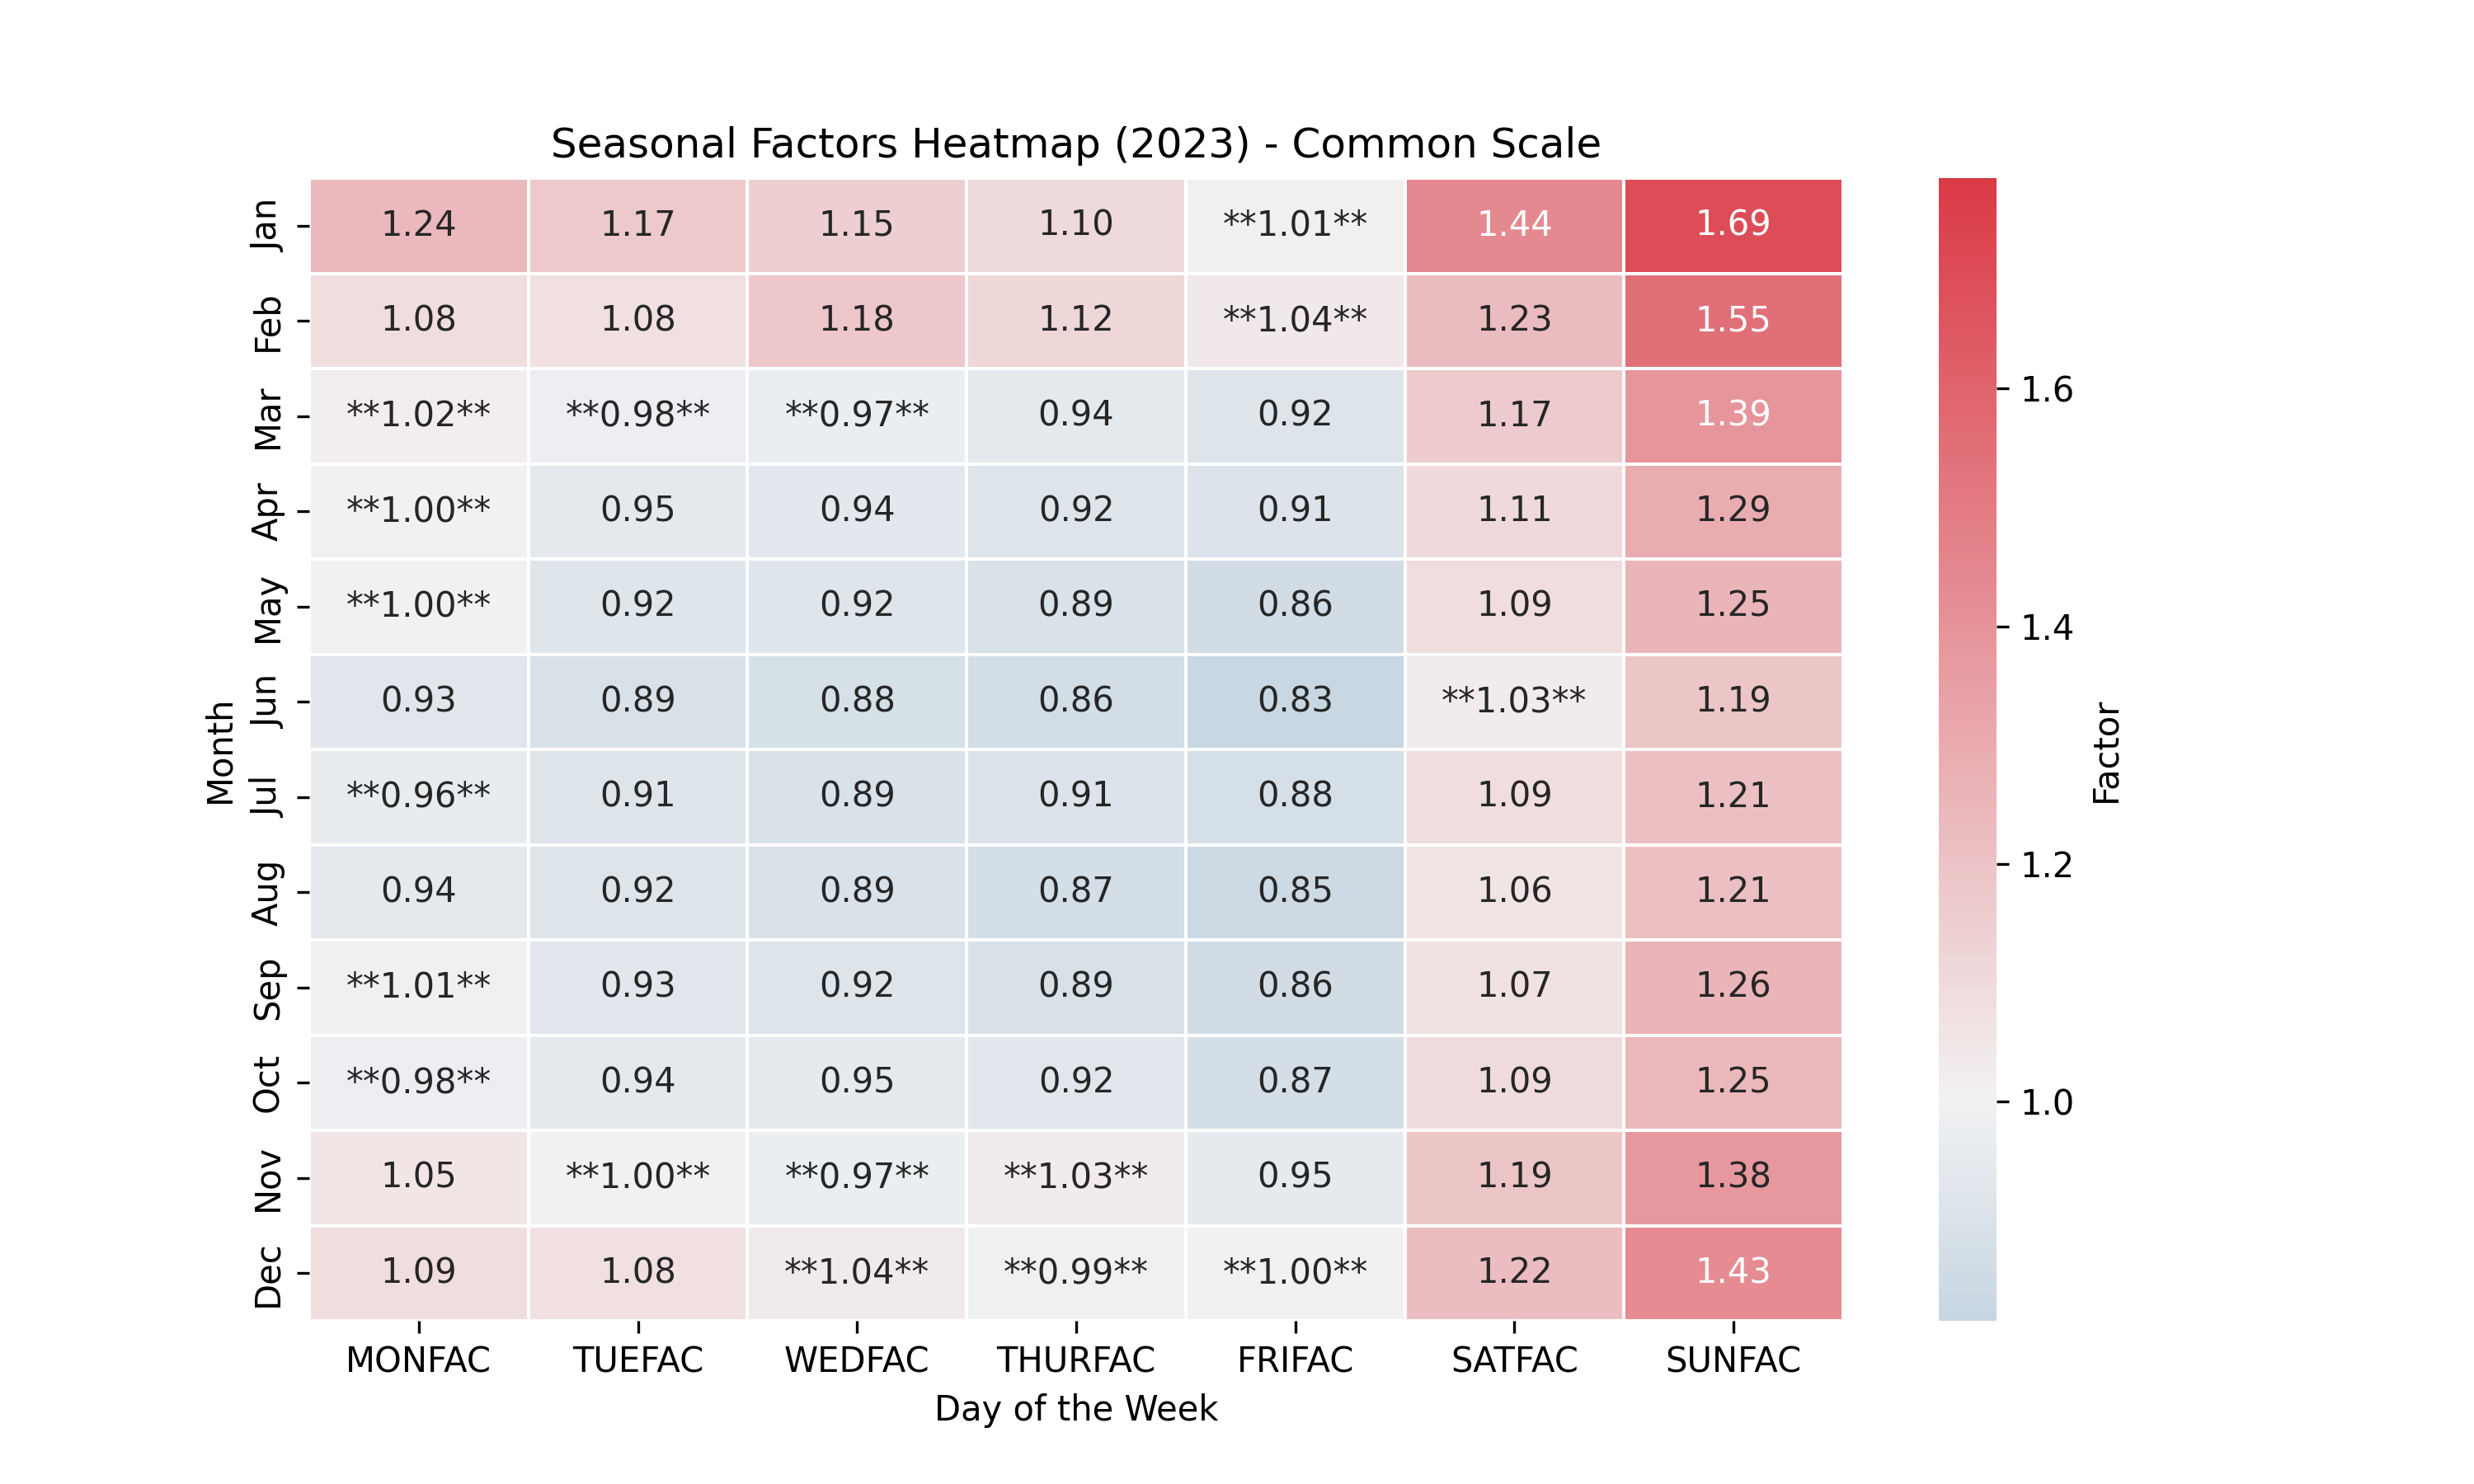
New charts use bold text for factors from 0.95 to 1.05, inclusive. Missing months or blank factor cells appear gray with a dash. Invalid values, duplicate months, and requested years with no numeric factors are reported before charts are created. This tool plots the supplied factors; it does not calculate them from traffic counts.
The script creates seasonal_heatmaps beside the workbook and saves files such as heatmap_2021_common_scale.png at 300 DPI. The workbook and existing images are preserved. If any target image already exists, choose another OUTPUT_FOLDER. The linked images and PDFs are the supplied examples; the updated script creates PNGs with revised styling.
The example workbook, three PNG charts, and two PDFs linked above are preserved in python/examples/seasonal-factors/. Download the maintained Python script below.
Settings & step-by-step instructions
Set EXCEL_FILE_PATH to your workbook and choose the first and last years to plot. Leave OUTPUT_FOLDER blank to use seasonal_heatmaps beside the workbook.
EXCEL_FILE_PATH = r"C:\CHANGE_ME\Seasonal Factor Table.xlsx"
SHEET_NAME = "Seasonal_Factor_Table"
START_YEAR = 2021
END_YEAR = 2023
OUTPUT_FOLDER = ""
DPI = 300- Download the Python script and example workbook above, or use your own workbook with the same columns.
- Install the two packages in Windows Terminal:
py -m pip install openpyxl matplotlib - Open the script in a text editor, set the full workbook path, year range, and optional output folder, then save.
- Open the folder containing the script in File Explorer, then right-click an empty area and choose Open in Terminal. Run:
py .\seasonal_factor_plots.py - Open the output folder printed in the terminal to view the PNG charts. Saving does not open plot windows or wait for you to close them.
The worksheet's first row must contain YEAR, MONTH, MONFAC, TUEFAC, WEDFAC, THURFAC, FRIFAC, SATFAC, and SUNFAC. Column order does not matter. Use whole years, month abbreviations Jan–Dec, and positive numeric factors. Additional columns such as ID and MONTHFAC are ignored.
If your workbook uses formulas, recalculate and save it in Excel first; the script reads saved values. No workbook is uploaded to this website. Package installation requires internet; generating charts works locally.
View Python code
Open this section to load the downloadable code.
If something needs attention
- “Set FOLDER_PATH” or “Folder not found”
- Replace the example path, save the script, and check that the folder exists and any network drive is connected.
- A job setting is missing
- Review the listing's settings. The historical third-section and year rules deliberately start incomplete because their old values may not fit your records.
- “Permission denied” or a file is in use
- Close the file in other apps and check that you can edit files in that folder. The script reports the problem and continues with other files.
- “Destination already exists”
- The operation was skipped for that file. For example, if both
Meeting Notes.docxandMeeting-Notes.docxexist, neither is overwritten. - Python cannot open the script
- Open the terminal in the folder containing the downloaded script and check that its filename ends in
.py. - The
pycommand is not recognized - If Python is installed, try
pythonin place ofpy. Otherwise, use the setup link above. - The summary says 0 changed
- Check the settings, folder, supported file types, and example naming pattern. A file may already match the desired result. Skipped counts also include other file types and excluded entries.